 CLIENTGEN + CLAUDE
Connect once.
Create in Claude.
Four simple steps to connect ClientGen and prepare your first campaign. Keep this guide open in one tab and Claude in another.
Share this page: new.clientgen.app/guides/claude-setup/
Before you begin
Have your Claude login and the email for your active ClientGen connector account ready. Need ClientGen access?
Connector URL
https://mcp.clientgen.app/mcpPaste this into the custom connector field in Claude.
- 01
Open the connector menu
In Claude, open Customize, then Connectors. Select + Add in the upper right, then Add custom connector.
Use the Open Claude settings button above to go straight there.

Actual Claude screen. Select the image to enlarge. - 02
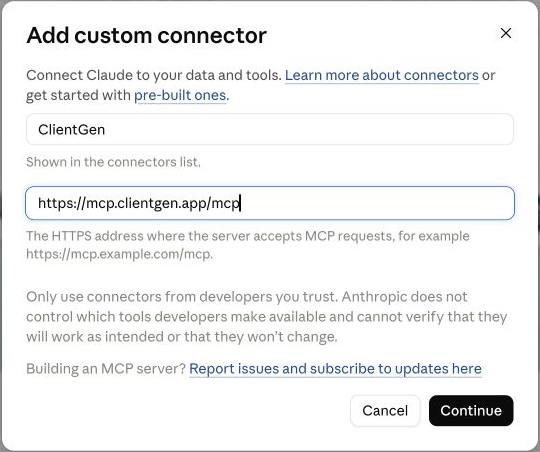
Paste the ClientGen URL
Enter ClientGen as the name. Paste https://mcp.clientgen.app/mcp in the server URL field. Select Continue and follow the remaining setup prompts.
Already installed? Open Yours and select the existing ClientGen connector instead of adding it again.
Actual Claude screen. Select the image to enlarge. - 03
Sign in and confirm the connection
Choose Connect if prompted. Sign in with the email on your ClientGen account and enter the emailed code when asked. Review the connection permissions, then return to Claude.
Under Connectors, open Yours and search for ClientGen. A checkmark in the Status column confirms it is connected.
Open ClientGen sign-in ↗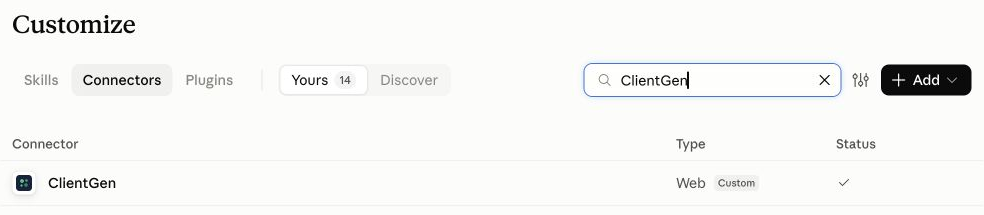
Actual Claude screen. Select the image to enlarge. - 04
Enable ClientGen in your chat
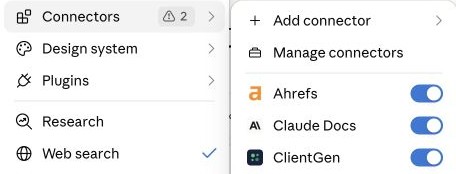
Open a new Claude chat. Select + beside the message box, open Connectors and make sure the ClientGen switch is on. You are ready to ask for your first campaign proof.
The blue switch beside ClientGen means it is enabled. Your other connectors may look different.
Actual Claude screen. Select the image to enlarge.
Try your first request.
Copy this into a new Claude chat with ClientGen enabled.
Open a new Claude chat ↗A few helpful notes
Using Claude with your team?
A workspace owner may need to add ClientGen in Organization settings → Connectors first. Each person then connects their own account.
Sign-in says you need access?
Use the email associated with your ClientGen account. If access is not active, request activation or email [email protected].
Your screen looks a little different?
Claude updates its menus over time. These screenshots were captured September 22, 2026. Claude’s current connector guide ↗